로컬에서 https 셋팅
- OpenSSL 방식은“주의요함(보안 경고)”가 나옴 제외
우선 Windows용 패키지 매니저 chocolatey 설치한다
( https://chocolatey.org/install#install-with-cmdexe )
* PowerShell 복사
Set-ExecutionPolicy Bypass -Scope Process -Force; [System.Net.ServicePointManager]::SecurityProtocol = [System.Net.ServicePointManager]::SecurityProtocol -bor 3072; iex ((New-Object System.Net.WebClient).DownloadString('https://community.chocolatey.org/install.ps1'))
choco 를 입력하여 버전이 나오면 설치 성공

그 다음 로컬 인증서를 만들어주는 mkcert를 설치해 준다.
* PowerShell 복사
choco install mkcert
* PowerShell 복사
mkcert -install
mkcert가 잘 설치되었다면 위 명령어를 이용해
로컬을 인증된 발급기관으로 추가합니다.
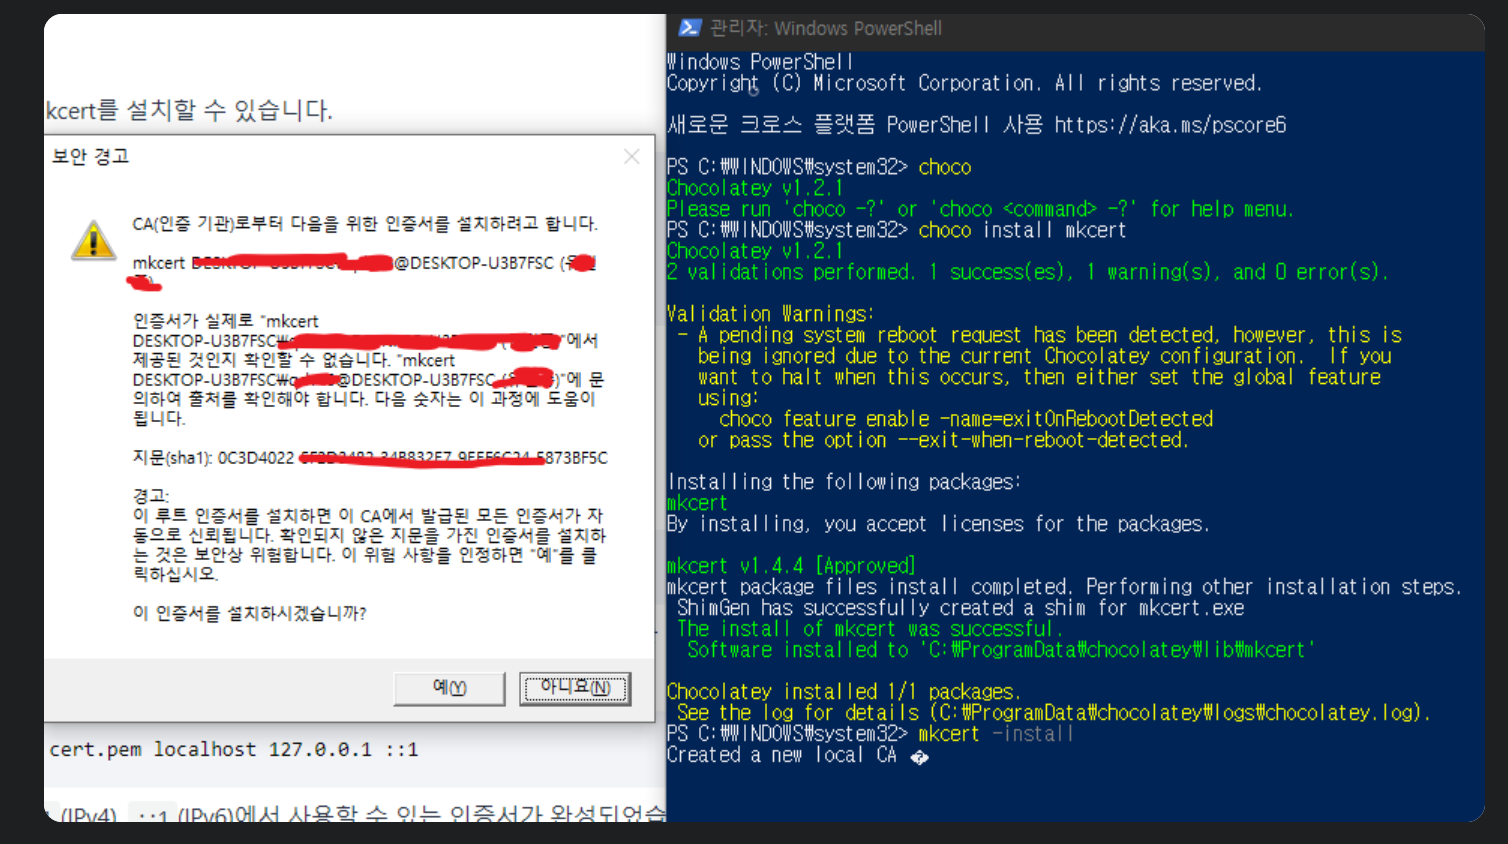
설치가 완료되었다면 아래 명령어를 입력해 인증서를 완성해줍니다.
localhost / 127.0.0.1 (IPv4) / ::1(IPv6)에서 사용할 수 있는 인증서를 만들겠다는 의미입니다.
C:\Windows\System32 에 key.pem과 cert.pem이 생성된 것을 확인할 수 있습니다.
* PowerShell 복사
mkcert -key-file key.pem -cert-file cert.pem localhost 127.0.0.1 ::1
프론트에 키 셋팅 프로젝트 루트에 certs/ *키 이름은 사용할 이름으로 변경
project-root/
 ├─ src/
 │   ├─ ...프론트 코드
 │   └─ certs/
 │        ├─ localhost.pem
 │        └─ localhost-key.pem
 ├─ vite.config.js (또는 vite.config.ts)
 ├─ package.json
기본 셋팅
// vite.config.ts
import { defineConfig } from 'vite'
import fs from 'fs'
import path from 'path'

export default defineConfig({
  server: {
    https: {
      key: fs.readFileSync(path.resolve(__dirname, './certs/localhost-key.pem')),
      cert: fs.readFileSync(path.resolve(__dirname, './certs/localhost.pem')),
    },
    port: 3000,
  },
})
EX ) 스마트온의 경우
import fs from 'fs';
import path from 'path';
        devServer: {
                https: {
                    key: fs.readFileSync(path.resolve(__dirname, './certs/localhost-key.pem')),
                    cert: fs.readFileSync(path.resolve(__dirname, './certs/localhost-cert.pem')),
                },
    ],
            port: 8080,
            // open: true, // opens browser window automatically
            proxy: {
                '/SmartOnCloudBeta/oauth': { target: VUE_APP_DEVSERVER },
                '/SmartOnCloudBeta/loginCheck': { target: VUE_APP_DEVSERVER },
                '/SmartOnCloudBeta/userPassUdt': { target: VUE_APP_DEVSERVER },
                '/SmartOnCloudBeta/api': { target: VUE_APP_DEVSERVER },
            },
        },
위는 localhost 상 인증서 발급
*도메인 연결 https 셋팅
https://ngrok.com/download 에서 ngrok.ex 다운
회원가입 후 로그인 하여 Your Authtoken 탭에서 Authtoken 발급 ㅎ후
* PowerShell 복사
ngrok config add-authtoken <여기에_토큰>
추가
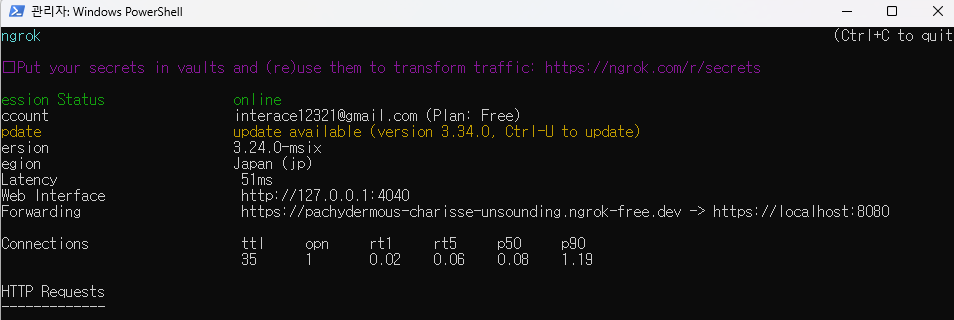
ngrok http <프론드 실행중인 포트> EX) 8080
여기서 Forwarding URL 입력하면 HTTPS 접속 가능 (EX> https://pachydermous-charisse-unsounding.ngrok-free.dev/ )
단 프론트가 https 라면 ngrok http https://localhost:8080 (유료버전의 경우 ngrok tls 8080 명령어로 TLS 엔드포인트 직접 접근 가능)
- OpenSSL 방식은“주의요함(보안 경고)”가 나옴 제외
우선 Windows용 패키지 매니저 chocolatey 설치한다
( https://chocolatey.org/install#install-with-cmdexe )
* PowerShell 복사
Set-ExecutionPolicy Bypass -Scope Process -Force; [System.Net.ServicePointManager]::SecurityProtocol = [System.Net.ServicePointManager]::SecurityProtocol -bor 3072; iex ((New-Object System.Net.WebClient).DownloadString('https://community.chocolatey.org/install.ps1'))
choco 를 입력하여 버전이 나오면 설치 성공
그 다음 로컬 인증서를 만들어주는 mkcert를 설치해 준다.
* PowerShell 복사
choco install mkcert
* PowerShell 복사
mkcert -install
mkcert가 잘 설치되었다면 위 명령어를 이용해
로컬을 인증된 발급기관으로 추가합니다.
설치가 완료되었다면 아래 명령어를 입력해 인증서를 완성해줍니다.
localhost / 127.0.0.1 (IPv4) / ::1(IPv6)에서 사용할 수 있는 인증서를 만들겠다는 의미입니다.
C:\Windows\System32 에 key.pem과 cert.pem이 생성된 것을 확인할 수 있습니다.
* PowerShell 복사
mkcert -key-file key.pem -cert-file cert.pem localhost 127.0.0.1 ::1
프론트에 키 셋팅 프로젝트 루트에 certs/ *키 이름은 사용할 이름으로 변경
project-root/
 ├─ src/
 │   ├─ ...프론트 코드
 │   └─ certs/
 │        ├─ localhost.pem
 │        └─ localhost-key.pem
 ├─ vite.config.js (또는 vite.config.ts)
 ├─ package.json
기본 셋팅
// vite.config.ts
import { defineConfig } from 'vite'
import fs from 'fs'
import path from 'path'

export default defineConfig({
  server: {
    https: {
      key: fs.readFileSync(path.resolve(__dirname, './certs/localhost-key.pem')),
      cert: fs.readFileSync(path.resolve(__dirname, './certs/localhost.pem')),
    },
    port: 3000,
  },
})
EX ) 스마트온의 경우
import fs from 'fs';
import path from 'path';
        devServer: {
                https: {
                    key: fs.readFileSync(path.resolve(__dirname, './certs/localhost-key.pem')),
                    cert: fs.readFileSync(path.resolve(__dirname, './certs/localhost-cert.pem')),
                },
    ],
            port: 8080,
            // open: true, // opens browser window automatically
            proxy: {
                '/SmartOnCloudBeta/oauth': { target: VUE_APP_DEVSERVER },
                '/SmartOnCloudBeta/loginCheck': { target: VUE_APP_DEVSERVER },
                '/SmartOnCloudBeta/userPassUdt': { target: VUE_APP_DEVSERVER },
                '/SmartOnCloudBeta/api': { target: VUE_APP_DEVSERVER },
            },
        },
위는 localhost 상 인증서 발급
*도메인 연결 https 셋팅
https://ngrok.com/download 에서 ngrok.ex 다운
회원가입 후 로그인 하여 Your Authtoken 탭에서 Authtoken 발급 ㅎ후
* PowerShell 복사
ngrok config add-authtoken <여기에_토큰>
추가
allowedHosts 셋팅 추가
        devServer: {
                https: {
                    key: fs.readFileSync(path.resolve(__dirname, './certs/localhost-key.pem')),
                    cert: fs.readFileSync(path.resolve(__dirname, './certs/localhost-cert.pem')),
                },
            allowedHosts: [
            "pachydermous-charisse-unsounding.ngrok-free.dev"
            ],
            port: 8080,
            // open: true, // opens browser window automatically
ngrok http <프론드 실행중인 포트> EX) 8080
여기서 Forwarding URL 입력하면 HTTPS 접속 가능 (EX> https://pachydermous-charisse-unsounding.ngrok-free.dev/ )
단 프론트가 https 라면 ngrok http https://localhost:8080 (유료버전의 경우 ngrok tls 8080 명령어로 TLS 엔드포인트 직접 접근 가능)
- OpenSSL 방식은“주의요함(보안 경고)”가 나옴 제외
우선 Windows용 패키지 매니저 chocolatey 설치한다
( https://chocolatey.org/install#install-with-cmdexe )
* PowerShell 복사
Set-ExecutionPolicy Bypass -Scope Process -Force; [System.Net.ServicePointManager]::SecurityProtocol = [System.Net.ServicePointManager]::SecurityProtocol -bor 3072; iex ((New-Object System.Net.WebClient).DownloadString('https://community.chocolatey.org/install.ps1'))
choco 를 입력하여 버전이 나오면 설치 성공
그 다음 로컬 인증서를 만들어주는 mkcert를 설치해 준다.
* PowerShell 복사
choco install mkcert
* PowerShell 복사
mkcert -install
mkcert가 잘 설치되었다면 위 명령어를 이용해
로컬을 인증된 발급기관으로 추가합니다.
설치가 완료되었다면 아래 명령어를 입력해 인증서를 완성해줍니다.
localhost / 127.0.0.1 (IPv4) / ::1(IPv6)에서 사용할 수 있는 인증서를 만들겠다는 의미입니다.
C:\Windows\System32 에 key.pem과 cert.pem이 생성된 것을 확인할 수 있습니다.
* PowerShell 복사
mkcert -key-file key.pem -cert-file cert.pem localhost 127.0.0.1 ::1
프론트에 키 셋팅 프로젝트 루트에 certs/ *키 이름은 사용할 이름으로 변경
project-root/
 ├─ src/
 │   ├─ ...프론트 코드
 │   └─ certs/
 │        ├─ localhost.pem
 │        └─ localhost-key.pem
 ├─ vite.config.js (또는 vite.config.ts)
 ├─ package.json
기본 셋팅
// vite.config.ts
import { defineConfig } from 'vite'
import fs from 'fs'
import path from 'path'

export default defineConfig({
  server: {
    https: {
      key: fs.readFileSync(path.resolve(__dirname, './certs/localhost-key.pem')),
      cert: fs.readFileSync(path.resolve(__dirname, './certs/localhost.pem')),
    },
    port: 3000,
  },
})
EX ) 스마트온의 경우
import fs from 'fs';
import path from 'path';
        devServer: {
                https: {
                    key: fs.readFileSync(path.resolve(__dirname, './certs/localhost-key.pem')),
                    cert: fs.readFileSync(path.resolve(__dirname, './certs/localhost-cert.pem')),
                },
    ],
            port: 8080,
            // open: true, // opens browser window automatically
            proxy: {
                '/SmartOnCloudBeta/oauth': { target: VUE_APP_DEVSERVER },
                '/SmartOnCloudBeta/loginCheck': { target: VUE_APP_DEVSERVER },
                '/SmartOnCloudBeta/userPassUdt': { target: VUE_APP_DEVSERVER },
                '/SmartOnCloudBeta/api': { target: VUE_APP_DEVSERVER },
            },
        },
위는 localhost 상 인증서 발급
*도메인 연결 https 셋팅
https://ngrok.com/download 에서 ngrok.ex 다운
회원가입 후 로그인 하여 Your Authtoken 탭에서 Authtoken 발급 ㅎ후
* PowerShell 복사
ngrok config add-authtoken <여기에_토큰>
추가
ngrok http <프론드 실행중인 포트> EX) 8080
여기서 Forwarding URL 입력하면 HTTPS 접속 가능 (EX> https://pachydermous-charisse-unsounding.ngrok-free.dev/ )
단 프론트가 https 라면 ngrok http https://localhost:8080 (유료버전의 경우 ngrok tls 8080 명령어로 TLS 엔드포인트 직접 접근 가능)